

The Comfort Food That Actually Has Your Back
Chicken pot pie is one of the most universally loved comfort foods. Flaky golden crust, creamy filling, tender chicken, soft vegetables. It is the kind of meal that feels like a reward at the end of a hard day. The problem with most versions is that they are built on a heavy cream of chicken soup base that is high in sodium, low in protein, and not doing much for you nutritionally beyond the comfort factor.
This version keeps everything that makes chicken pot pie worth eating and swaps the canned soup for the protein cream of mushroom sauce from the sauces section on the blog. That one change takes the filling from a processed, sodium-heavy base to something made from real ingredients with actual protein built in. Combined with rotisserie chicken and a full bag of mixed vegetables, each serving comes in at 26 grams of protein with a filling that tastes richer and more homemade than the standard version.
Store-bought pie crust keeps the prep time reasonable. You are not here to make pastry from scratch on a weeknight. The filling takes about five minutes to put together and the oven does the rest. An hour from start to finish for a pot pie that feeds six people and tastes like something you would make on a Sunday when you actually have time.
This is one of those recipes that makes everyone at the table happy without making you feel like you compromised. That combination does not come along that often.
What Makes This Filling Different From the Can
The protein cream of mushroom sauce is the foundation of this recipe and it is worth understanding why it matters. Traditional chicken pot pie recipes call for one or two cans of cream of chicken or cream of mushroom soup, which is convenient but comes loaded with sodium, starches, and very little protein. The sauce from the sauces section replaces all of that with a homemade version that has a cleaner ingredient list and protein built right into the base.
The sauce coats the chicken and vegetables and creates that thick, creamy filling that holds together when you cut into the pie. It behaves exactly the way a canned soup filling would in the oven but it tastes noticeably better. The mushroom flavor adds a savory depth that cream of chicken alone does not have.
Rotisserie chicken keeps the prep simple. It is already cooked, already tender, and shreds in a few minutes. Frozen mixed vegetables go straight in from the bag with no thawing needed. Everything gets combined in one bowl and poured into the crust. The simplicity of the assembly is part of what makes this recipe practical enough to actually make.
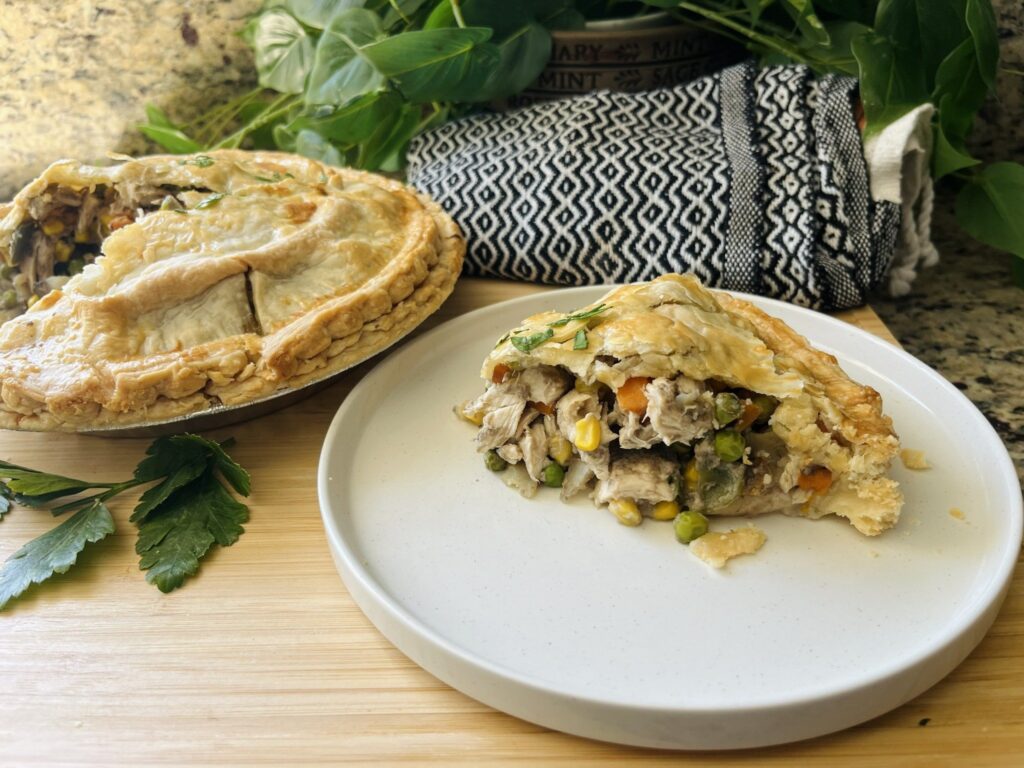
The egg wash is the step that separates a good-looking pot pie from a flat one. Brushing the top crust with whisked egg before baking gives it that deep golden color and slight sheen that makes it look like it came from a bakery. Do not skip it. It takes ten seconds and makes a visual difference that is worth the effort.
Steam vents cut into the top crust are not just decorative. They allow moisture to escape during baking so the filling can bubble up properly and the crust stays crispy rather than getting soggy from trapped steam. Three or four small cuts is enough.
Let’s Talk Ingredients
2 cups rotisserie chicken, shredded
The protein anchor of the filling. Rotisserie chicken is already cooked and seasoned, which means the filling has flavor built in from the start without any additional seasoning needed beyond what is in the sauce. Shred it into bite-sized pieces so every forkful has a good ratio of chicken to vegetables. A mix of white and dark meat gives you the best texture and flavor. If you cook your own chicken, boneless thighs stay moister than breast meat in a long bake.
2 cups frozen mixed vegetables
Carrots, green beans, corn, and peas is the classic combination and what most frozen mixed vegetable bags contain. They go in frozen straight from the bag. They will thaw and cook through during the 45 to 60 minute bake time in the oven. No need to thaw or pre-cook. If you want to use fresh vegetables, dice them small and saute briefly in a little butter or olive oil before combining with the chicken and sauce.
1 1/2 cups protein cream of mushroom sauce
The sauce from the sauces section on the blog. Have it made and ready before you start assembling the pie. It should be warm and pourable when it goes into the filling so it coats everything evenly. If it has been in the fridge and thickened, warm it gently in a saucepan with a small splash of broth until it loosens back to a pourable consistency. This is the ingredient that makes this pot pie stand out from a standard recipe.
1 store-bought pie crust
Most store-bought pie crusts come with two rounds per package, which gives you both a bottom and a top crust. Whether you use both is up to you. A top crust only is faster to assemble and still gives you the full pot pie experience. A bottom and top crust is more traditional and makes the pie more self-contained when you slice it. Either way, let the crust come to room temperature for about 10 minutes before unrolling so it does not crack.
1 egg, for egg wash
Whisked and brushed over the top crust before baking. The egg wash is what gives the crust its golden color and slight sheen. Without it the crust bakes to a pale, matte finish. One egg is more than enough for one pie. Whisk it with a fork until smooth and brush it on in a thin, even layer with a pastry brush or your fingers.
Make It Once, Eat It All Week
A pot pie that serves six is genuinely one of the better meal prep investments you can make because it holds up in the fridge and reheats well. The filling stays creamy and the crust, while it softens slightly overnight, comes back to life with a few minutes in the oven or air fryer.
Store leftover pie covered in the fridge for up to four days. To reheat individual slices, place on a baking sheet and warm in a 350 degree oven for about 15 minutes until heated through, or in the air fryer at 350 for 8 to 10 minutes. The air fryer does the best job of bringing the crust back to a crispy texture. The microwave works but the crust will be soft.
This also freezes well before baking. Assemble the pie fully, wrap tightly in plastic wrap and foil, and freeze for up to two months. Bake from frozen at 375 degrees with foil over the top for the first 30 minutes, then remove the foil and bake another 30 to 40 minutes until the crust is golden and the filling is bubbling. Add about 20 to 30 minutes to the total bake time compared to a fresh pie.
For a weeknight shortcut, assemble the pie over the weekend when you have more time and refrigerate unbaked for up to 24 hours. Pull it from the fridge while the oven preheats and bake as directed. The cold filling will need an extra 5 to 10 minutes in the oven but the result is the same as a freshly assembled pie.
If you are feeding a smaller household, this recipe cuts in half easily. Use a smaller pie dish and reduce the bake time slightly since a shallower filling heats through faster. Check at the 35 minute mark.