

The Freezer Treat That Actually Has Protein In It
If you have ever bought a protein bar at the store and flipped it over to check the label, you know the drill. A lot of them are basically candy bars with a better marketing budget. They taste fine but they are not doing much for you nutritionally, and they are expensive for what you get.
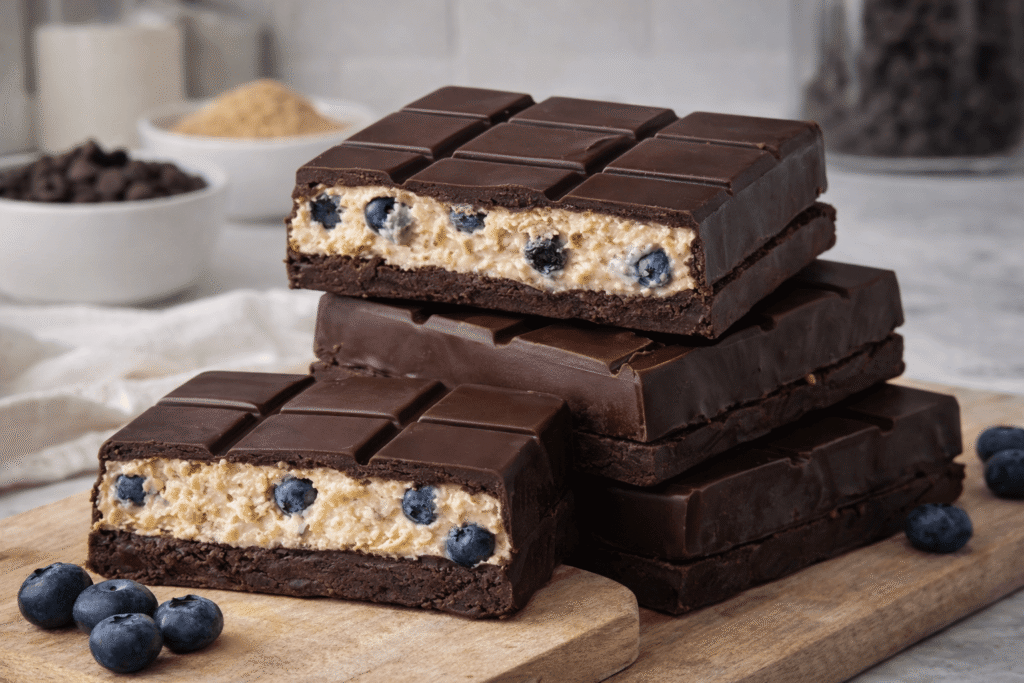
These Dubai protein bars are different. You make them yourself, you know exactly what is in them, and they taste like something you would buy from a specialty chocolate shop. Sugar-free chocolate shell, creamy Greek yogurt filling with peanut butter powder, fresh blueberries folded in. They come out of the freezer looking polished and tasting genuinely indulgent.
No baking involved. You melt chocolate, layer things into silicone molds, and freeze. The active time is about 20 minutes. The freezer does the rest.
These are the kind of thing you make on a Sunday and then feel pretty good about yourself all week. Grab one from the freezer when you want something sweet and you are done. No spiral, no guilt, no problem.
Why This Recipe Works
The structure of these bars is simple: chocolate shell on the outside, yogurt filling on the inside. But the way each layer is built matters.
The chocolate gets layered into the bottom of the mold first and frozen until set before the filling goes in. This creates a solid base so the filling does not seep through and the bar holds its shape when you pop it out. The second chocolate layer goes over the top and freezes to create the lid. The whole bar becomes one solid, cohesive thing.
The filling is Greek yogurt mixed with peanut butter powder and a little maple syrup. Peanut butter powder gives you peanut butter flavor and protein without the added fat and calories of regular peanut butter. Greek yogurt brings creaminess, protein, and a slight tang that cuts the sweetness of the chocolate. The two together create a filling that is creamy and satisfying without being heavy.
The blueberries are folded in at the end. They add a little burst of juice inside each bar when you bite into it, which is a nice contrast to the chocolate and the creamy filling. They also make the bars look interesting when you cut one in half.
Coconut oil in the chocolate is optional but worth using. It makes the melted chocolate smoother and slightly thinner, which means it coats the mold more evenly and creates a thinner, snappier shell. Without it, the chocolate can be a little thick and harder to work with.
Let’s Talk Ingredients
2 cups sugar-free chocolate chips
The shell of the bar. Use a sugar-free chocolate you actually like the taste of, because it is the most prominent flavor. Lily’s and ChocZero are two popular brands. Some sugar-free chocolates have a slight aftertaste from the sweetener, so taste a chip before you commit to a whole batch. If you do not care about the sugar-free aspect, you can use regular dark chocolate chips.
1 tsp coconut oil (optional)
Adds to the melted chocolate to make it smoother and easier to pour into the molds. It also helps the finished shell have a clean snap instead of crumbling when you bite in. If you do not have it, skip it. The bars will still work, the chocolate will just be slightly thicker.
1 cup plain Greek yogurt
The base of the filling. Use full-fat or 2% for the best texture and creaminess. Non-fat Greek yogurt is thinner and the filling may not set as firmly. Make sure it is plain, not flavored. Flavored yogurt has added sugar and a different flavor profile that does not work as well here.
2 tbsp maple syrup (or sugar-free syrup)
Sweetens the filling slightly. Regular maple syrup is fine if you are not counting every carb. If you want to keep the bars lower sugar, use a sugar-free maple syrup instead. The amount is small enough that either option keeps the bars tasting like a treat rather than a diet food.
3 tbsp peanut butter powder
This is what gives the filling its peanut butter flavor without adding a lot of extra fat. Peanut butter powder is made from pressed peanuts with most of the oil removed. It mixes into the yogurt smoothly and adds protein along with the peanut flavor. PBfit and PB2 are both widely available. If you cannot find it, you can use 2 to 3 tablespoons of regular natural peanut butter instead. The filling will be richer and slightly higher in fat.
1/2 cup fresh blueberries
Folded into the filling for little pockets of fruit inside each bar. Fresh blueberries work best because they hold their shape and do not add extra moisture. If you only have frozen, thaw them fully and pat them dry with paper towels before using. Otherwise they will water down the filling and make it harder to set.
Getting the Layers Right
This recipe has a few steps but none of them are complicated. The biggest thing is patience between layers. Rushing the freezing steps means the layers will not set properly and the bar will fall apart when you try to unmold it.
The first chocolate layer goes into the bottom of each mold and needs 5 to 10 minutes in the freezer before the filling goes in. You want it fully solid, not just firm. If you tilt the mold and the chocolate moves at all, it is not ready.
When you add the filling, leave a little space at the top of each mold. The final chocolate layer needs somewhere to go. If you fill the molds all the way to the top with yogurt, the chocolate lid will spill over the edges and you will end up with a mess.
After the filling goes in, freeze for another 15 to 20 minutes. It should be slightly firm but not rock solid. You want it set enough that the chocolate layer on top does not sink into it.
The final chocolate layer seals the bar. Pour it over the top and use a spoon or small spatula to smooth it out. Then freeze for another 30 to 40 minutes until fully set. Do not rush this step. If the chocolate is not fully set, the bars will crack or crumble when you unmold them.
To unmold, flex the silicone mold slightly and press up from the bottom of each cavity. They should pop out cleanly. If they are sticking, they may need another few minutes in the freezer. Serve straight from the freezer for the best texture. If you let them sit at room temperature for too long, the yogurt filling starts to soften and things get messy.