

Fried Chicken That Actually Fits the Way You Eat
Fried chicken has a reputation as the thing you eat when you are not paying attention to what you are eating. The breading, the oil, the carb load from the flour coating. Most low-carb versions try to fix this by baking instead of frying and using almond flour, and they end up with something that is fine but does not scratch the actual fried chicken itch.
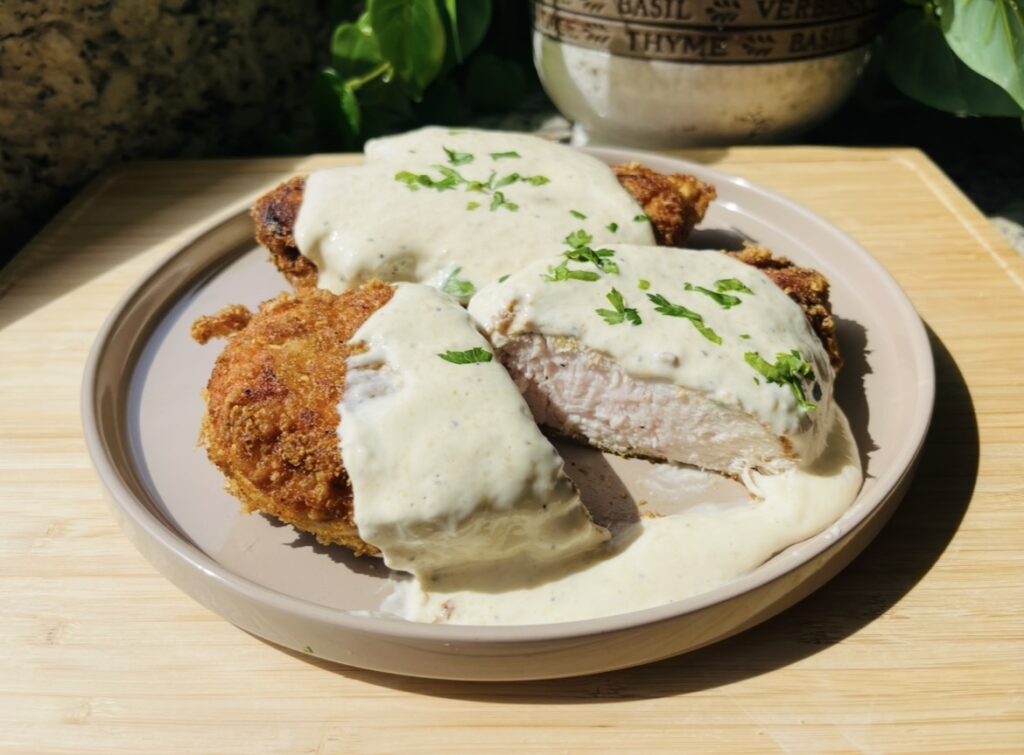
This version does it differently. The breading is pork rind crumbs, which fry in avocado oil and get genuinely crispy in a way that baked almond flour coating does not. The result is a chicken cutlet with a crunchy exterior that has real texture and holds up when you cut into it. Five grams of carbs per serving. Fifty-five grams of protein.
The creamy garlic sauce that goes on top is made in a blender from cottage cheese, bone broth, garlic, and aromatics. It is smooth and rich and deeply savory and it transforms a piece of fried chicken into something that tastes like a restaurant dish. Spooned over the top while the chicken is still hot, it seeps into the crust slightly and makes every bite better than the last.
Twenty-five minutes. One pan for the chicken. One blender for the sauce. This is a weeknight recipe that punches well above its weight.
Pork Rinds as Breading — Why It Actually Works
Pork rind crumbs have become one of the more reliable low-carb pantry staples for good reason. Ground into fine crumbs, they behave very similarly to breadcrumbs in a coating application. They adhere to an egg-washed cutlet, they fry to a golden brown color, and they get genuinely crispy rather than just coating the outside of the chicken.
The key difference from regular breadcrumbs is that pork rind crumbs have zero carbs. They are essentially just fried pork skin ground into crumbs. The fat content in the crumbs also means they brown well in the pan without needing as much oil as a flour-based coating. They are also neutral enough in flavor that the seasoning on the chicken and the sauce on top are what you taste, not the coating itself.
Pounding the chicken thin before breading is not optional. An even thickness means the chicken cooks through at the same rate as the outside browns. Thick spots in an uneven cutlet will still be underdone when the outside is golden and crispy. Pound to about a half-inch thickness using a meat mallet, the bottom of a heavy pan, or a rolling pin. This also speeds up the cook time significantly.
The creamy garlic sauce is built from the same blended cottage cheese base that appears throughout this blog. Cottage cheese, bone broth, roasted garlic, garlic powder, onion powder, and yellow onion all go into the blender and come out as a smooth, creamy sauce with a deep savory flavor. It heats quickly on the stovetop and stays silky and pourable. Spooned generously over the hot crispy chicken, it is the finishing element that makes this dish feel complete and substantial.
Let’s Talk Ingredients
2 to 3 chicken breasts, pounded thin
Pounded to an even thickness of about half an inch. This is the step that most people skip and then wonder why the chicken is not cooked through evenly. Place each breast between two sheets of plastic wrap or in a zip-lock bag and pound from the center outward. The breast will spread significantly. Cut in half after pounding if the pieces are very large. Thin cutlets cook faster, more evenly, and produce a better ratio of crispy exterior to juicy interior.
2 eggs, for egg wash
Whisked together and used to coat the chicken before the pork rind crumbs go on. The egg wash creates a sticky surface that the crumbs adhere to. Make sure the entire surface of each cutlet is coated in egg before pressing into the crumbs. Gaps in the egg wash create gaps in the breading and spots that do not crisp up properly.
1 to 1 1/2 cups pork rind crumbs
The low-carb breading. You can buy pre-ground pork rind crumbs or grind whole pork rinds in a food processor or blender. Either works. The crumbs should be fine enough to coat the chicken evenly rather than chunky pieces that fall off. Press the crumbs firmly onto each egg-washed cutlet so they adhere. The coating that sticks best is the one that gets pressed in rather than just scattered on top.
Salt and pepper, to taste
Season the chicken before the egg wash. The coating adds very little seasoning on its own and the chicken needs salt at the base level before anything else goes on. A good pinch of salt and several cracks of black pepper on each cutlet before dipping in egg is the right approach.
Avocado oil, for frying
A neutral oil with a high smoke point that is well suited for pan frying. Use enough to come about a quarter inch up the side of the cutlets so they fry rather than saute. Medium heat is right. Too high and the outside burns before the inside is done. Too low and the coating absorbs oil and gets greasy rather than crisping. The oil is ready when a pinch of crumbs dropped in sizzles immediately.
2 cups cottage cheese
The base of the garlic sauce. Full-fat for the richest, creamiest result. Goes straight into the blender with everything else for the sauce. The cottage cheese blends completely smooth and creates a thick, creamy sauce base that picks up the garlic and onion flavors intensely. The sauce should be smooth enough that there is no trace of curd texture after blending.
1/2 cup bone broth
Thins the cottage cheese to a pourable, spoonable sauce consistency. Chicken bone broth is the most neutral and works best here. It also adds depth and a small protein boost to the sauce. If the sauce is too thick after blending, add a splash more broth and blend again. It should be thick enough to coat the chicken but thin enough to spoon easily.
2 cloves garlic
Fresh garlic goes into the blender raw with the cottage cheese. It gets blended completely smooth so there are no chunks, but the raw garlic flavor is more intense than roasted. Two cloves gives you a clear, present garlic flavor without being aggressive. If you prefer a milder, sweeter garlic flavor, roast the cloves in the oven at 400 degrees for 20 minutes before blending.
2 tbsp garlic powder
Works alongside the fresh garlic to build a deeper, more layered garlic flavor in the sauce. Garlic powder has a different quality than fresh garlic. It is softer and more background. Together they create a sauce that has both immediate garlic flavor and lingering depth. Two tablespoons sounds like a lot but spread across the whole sauce it balances out.
2 tbsp onion powder
Adds a savory sweetness to the sauce that rounds out the garlic and prevents it from being one-dimensional. Onion powder in a blended sauce distributes evenly and contributes a background depth that fresh onion also adds but in a different way. Both are in this recipe for that layered effect.
1/4 cup yellow onion
Fresh yellow onion goes into the blender with everything else. It blends completely smooth and adds a fresh, slightly sharp onion flavor that the powder alone does not have. Yellow onion is milder and sweeter than white or red when raw, which keeps the sauce from being too sharp.
Fresh parsley, chopped
Scattered over the top of the finished dish. Adds color and a fresh, herby brightness that cuts through the richness of the garlic sauce and the fried chicken. A small handful is enough. It also makes the dish look finished and intentional on the plate.
Getting the Fry Right
Pan frying chicken cutlets is a technique that rewards attention. The biggest mistakes are oil that is not hot enough, overcrowding the pan, and flipping too early.
The oil needs to be properly hot before the chicken goes in. A pinch of pork rind crumbs dropped into the oil should sizzle immediately and actively. If the oil is not hot enough, the coating absorbs it rather than crisping against it and you end up with greasy, soft breading instead of a crispy crust. Let the pan heat for a couple of minutes over medium heat before adding the oil, and then let the oil heat for another minute before the chicken goes in.
Do not overcrowd the pan. Two or three cutlets at most depending on the size of your pan. Overcrowded cutlets trap steam between them and the coating softens rather than crisps. If you are making a full batch, fry in batches and keep finished cutlets warm in a 200 degree oven on a wire rack while the rest cook.
Let the chicken cook undisturbed for four to seven minutes on the first side before flipping. Flipping too early tears the breading before it has had a chance to set and form a crust. The chicken will release from the pan naturally when the crust is ready. If it is sticking, it is not done on that side yet.
Rest the chicken for a couple of minutes after cooking before spooning the sauce on top. This lets the juices redistribute and keeps the interior moist when you cut into it. The sauce goes on at serving time, not in the pan.